Overview
Conducting a Stocktake can be a daunting task.
It's a time-consuming necessity, sometimes a dreaded task, and can be very difficult to perfect. It starts with proper preparation; add in diligent Product Maintenance, adhering to proper Stock Control methods, and set your Stocktake process up for success.
Bepoz can help with the entire process by following these simple steps:
1. Accurate Product Setup
Before any stock is counted, it's essential that all Product Purchase and Selling Sizes are accurate in BackOffice so that the correct amount of Stock is deducted
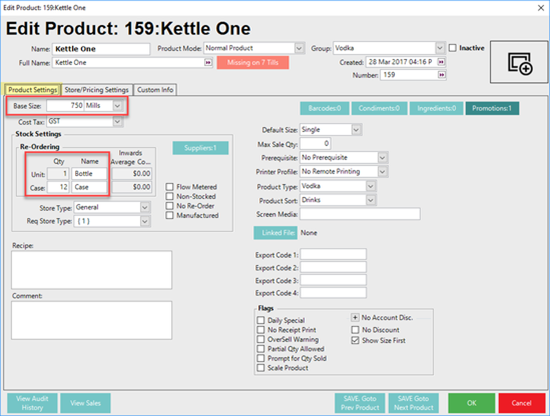
For example, if a bottle of Vodka is added to your Product List, the Base Size should be the volume of the bottle. Accuracy here is essential - is it a 750-milliliter bottle or a full litre? If you purchase both Sizes, add a Product into your System for each; this will making counting Stock MUCH easier.
How will the Vodka be sold? Even if the Base Size is 750mills, A Selling Size of 1 Item is OK, along with any other divisions of the Base size such as a Nip or Half Nip.
Keep in mind, that the selling Size/s can change for each Store that the Product is sold in. Maybe one of your bars sells the full bottle for table service, while others only sell a single or double pour.
Lastly, how are these Bottles being purchased? 6 per case? 12 per case?
Give the Unit and Case Size a Name that makes sense, and enter the quantities relevant to the reorder quantity.

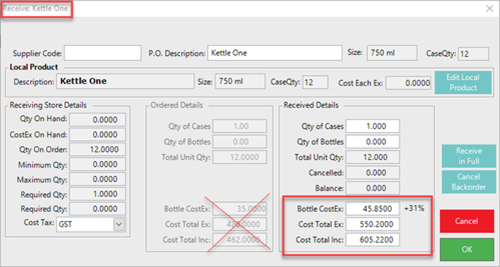
2. Accurate Product Costs
As the Product is Received from Suppliers, Costs should be updated accurately each time. That case of 12 bottles of vodka may have been $420 the last time you Purchased it, but if your Supplier raises the Price to $550, that's a 32% increase and more than a $10 increase per Bottle.
If that Cost isn't updated prior to a Stocktake, your System will think the Product was purchased at the wrong Price. Your invoices and your reporting will not add up and it will negatively impact your post-Stocktake reporting.

3. Adjust & Post Purchase Orders
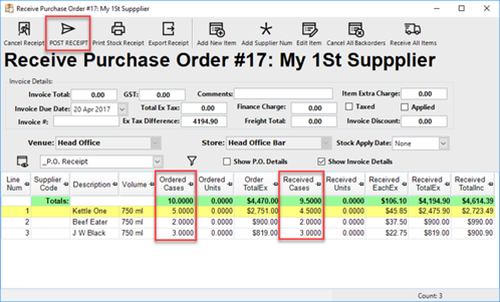
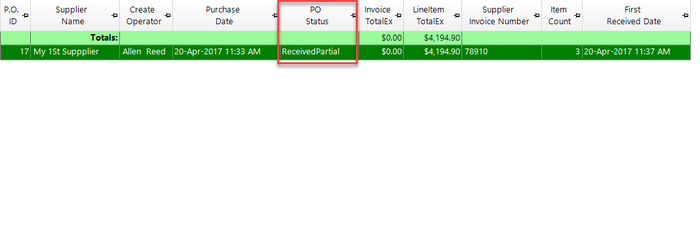
As Products are Received, Purchase Orders should be updated and Posted accordingly.
This means that each Product on that Purchase Order must be checked off against what was ordered and adjustments need to be made. This is crucial to Stock Control in having accuracy in Receiving P.O.s to obtaining a perfect Stocktake.
This can be time-consuming when receiving a large order, but an oversight here will carry over into post-Stocktake reporting. If you're expecting to receive 5 cases of vodka, but your supplier shorts you half a case - aside from the potential of running into a Stock shortage for a busy weekend - this must be caught and corrected before the P.O. is marked as Received and the Receipt is Posted. And then, have a nice chat with your supplier rep.
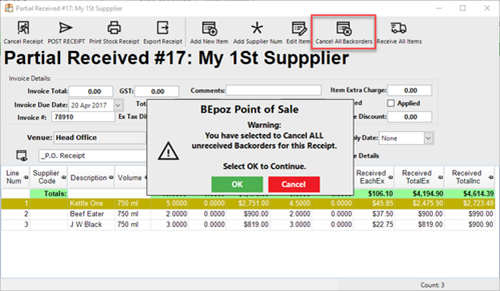
After Product receipt and adjustments, don't forget to Post each Invoice, even if the Product is only Partially Received. An Unposted Receipt makes it look like your Stock on Hand grew overnight by itself.
If it's decided to leave that Product short and you'll reorder the necessary quantity on your next order, Cancel the Backorder for the P.O. and Post the Receipt.
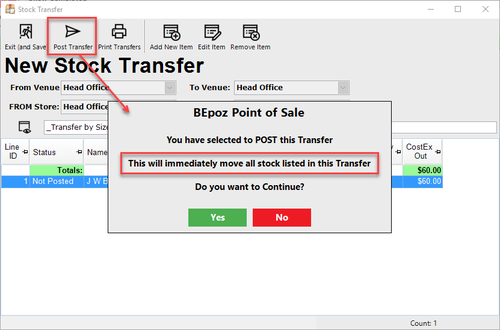
4. Track all Stock Transfers
Any Transfers between Stores need to be tracked and entered through Backoffice as Stock Transfers when the Product moves from one location to another.
Even if the Stock was received correctly and accurately, any untracked Transfers will skew numbers for the individual locations involved. If your Main Bar Transfers a few bottles back to your Warehouse or to another bar but the Transfer isn't tracked - it's difficult to find out where'd those bottles went?
Your overall Stock on Hand hasn't changed, so does it really matter? In short, YES. If Transfers are consistently tracked, it's easier to spot potential theft when Product really does go missing. Also, your Stocktake for each Store will be so much closer to being perfect.

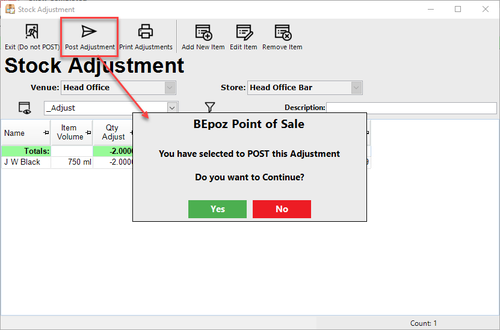
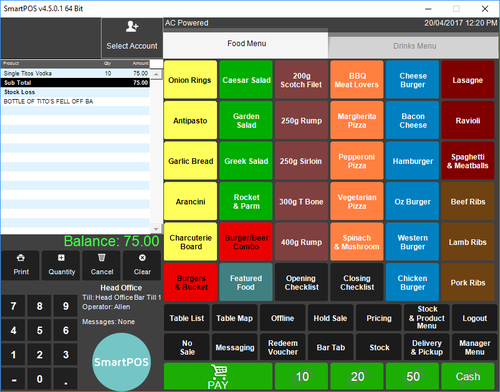
5. Update Stock Adjustments & Wastage
Sometimes, things don't go perfectly - your Supplier can make a mistake that isn't caught causing a Receipt to be Posted incorrectly; a Stock Transfer doesn't get Tracked and a bar ends up with an extra case of wine?; a half-full bottle falls off the back bar and shatters.
Whatever the case may be, Adjust that Stock!
Stock Adjustments or Re-Initialisations can be entered easily in BackOffice and Wastage from the POS, using Stock Loss, can be Tracked.


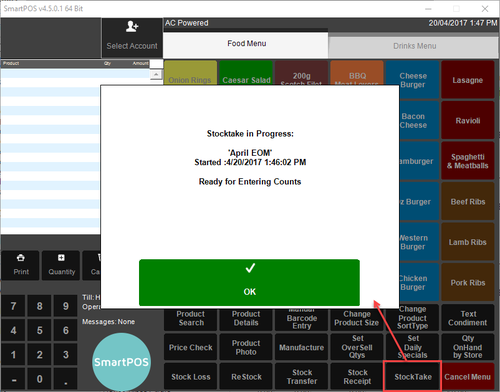
6. Whether to do a Full or Partial Stocktake?
Before starting a Stocktake, you'll need to consider whether it will be a Full or Partial Stocktake.
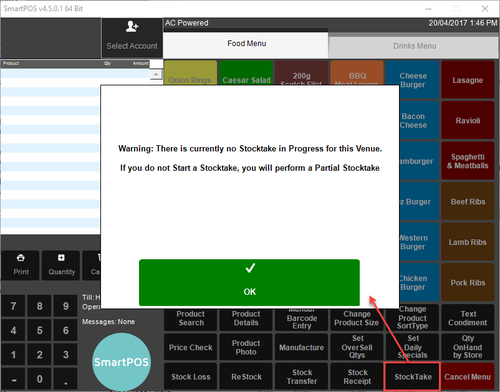
In a Full Stocktake, any Product (in a Store) that is not counted will have its Quantity on Hand set to Zero (0) when the Stocktake is applied.
In a Partial Stocktake, only Products that have been counted will be updated; all other Products will retain their theoretical QOH as the QOH after the Stocktake is applied. This will include any actual counts of zero.
Both methods have advantages depending on your preferences and needs. Maybe you'd like to perform a weekly Partial Stocktake on certain Products, but a Full Stocktake monthly? Maybe you'd like to reset your QOH for all packaging to zero rather than counting them?
Also, you can select which Stores in each Venue you'd like to do a Stocktake for - decide if you want a particular Stocktake to be for your entire Venue or for select Stores.
Pro-tip: If a Stocktake isn't initiated in BackOffice, any Stocktake started from a SmartPOS Workstation will default to Partial.

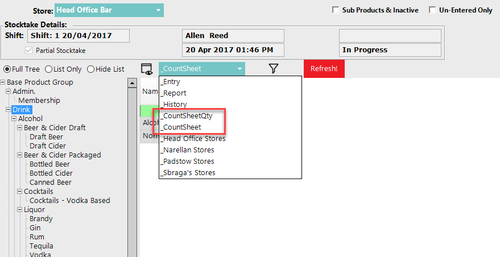
7. Print Count Sheets that Make Sense
Printing Count Sheets for Manual Stocktake may not seem that important, but if done correctly, it can make counting much easier and can reduce the chance of making a counting error.
For starters, decide if you'd like to print your Count Sheets with theoretical QOH or not; from the Stocktake Entry tab, change the View to _CountSheetQty.
Secondly, select and Print out Count Sheets by Product Groups that will make sense when it comes to actually counting. This will be different for each Organisation, however, something to keep in mind is that it may be easier to have fewer Products on a count sheet rather than having an entire Store's Product List together. For instance, break your Count Sheets down based on how Products may be organized in the Store. Or, in the same sense, order your Count Sheet list by Parent Group Name as that will more than likely carry over into how Products are organized in reality in your location. If your packaged beer & cider is kept in a refrigerator separate from other cold Products, Print a separate Count Sheet for that Product Group.
Thirdly, if you know that you have multiple Base Sizes of the same Product, you should have separate Product Lines for each.


8. Precise Counting and Count Entry
Counting and Count Entry is important. A decimal point in the wrong place or an extra zero where it doesn't belong could equate to a veritable disaster.
If the person Entering Counts isn't the person physically Counting, everyone needs to be on the same page.
Even if the most precise Counting has been conducted, attention to detail when those Counts are being Entered is critical to having a perfect Stocktake. Double-check figures before Entering the Counts.
Also, if a Product on the list wasn't Counted, it may be wise to investigate sooner rather than later.

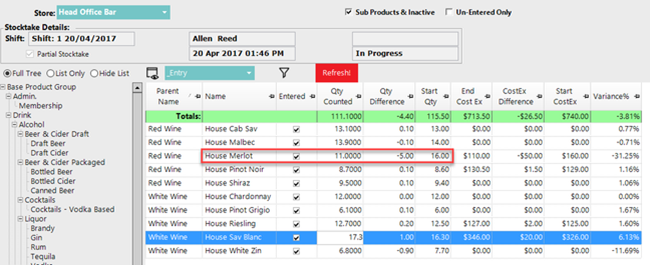
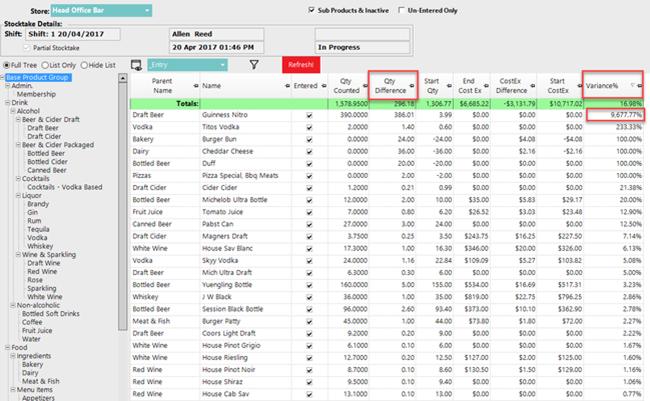
9. Check Variances, Recount & Re-Enter
Spotting Product Variances prior to Applying a Stocktake is of vital importance.
The Count Entry in BackOffice, Qty Difference, CostEx Difference, and Variance% are the best places to look.
Any large Variances should be investigated. The Product should be Recounted and Re-entered if a new Counted Quantity is found; maybe even Stock Reinitialised.
A lot of smaller variances can add up quickly, so even if a Product Variance % is off by single digits, it could be worth Recounting, in the long run, to ensure accuracy prior to Applying the Stocktake.
Pro Tip: Sort your Product List by either Qty Difference or Variance% to spot the larger Variances easier.
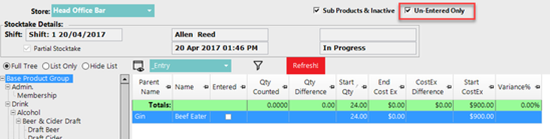
Don't forget to use the Un-Entered Only flag to slim down your Product List to view Products that haven't had a Counted Quantity Entered yet.
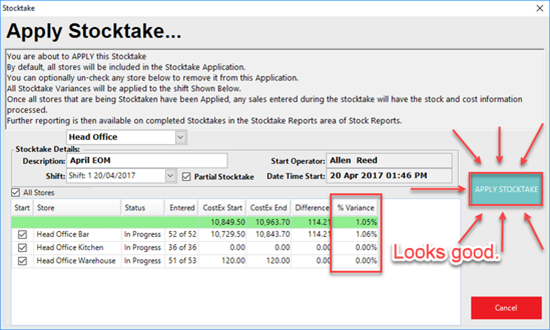
As a fail-safe, before Applying a Stocktake, the overall Variance % for the Venue and for each Store will be displayed. If it's too high for your liking (or per your Organisation's standards) - investigate!
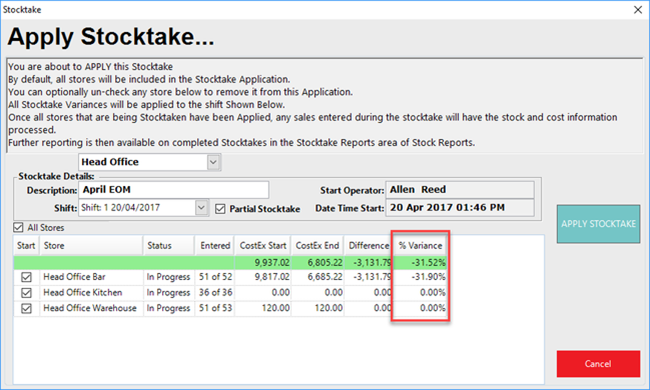
10. Apply the Stocktake
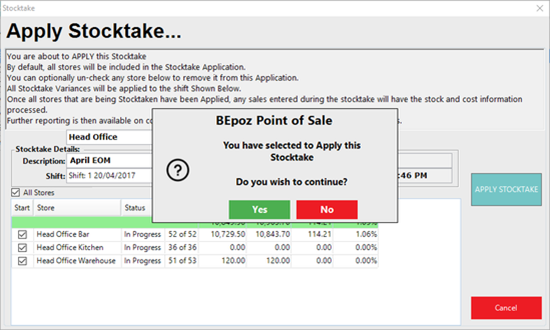
It should go without saying, but it needs to be said - DON'T FORGET TO APPLY YOUR STOCKTAKE.
Go ahead and click that APPLY STOCKTAKE button if you're satisfied with your Counts. The QOH in your system will be updated and you'll have come full circle back to the start of your next Perfect Stocktake. 
Lastly a recommendation.
A PDE can save you Time when entering and uploading Stock Counts.
Efficiency is part of the perfect Stocktake.
Video Walkthrough