
Overview
A Package Selection Product is used when one sellable Product is sold at a set price, but the Product allows a selection of other Products to be chosen during the sale.
In a Package Selection Product, the available Products are configured in advance, but the final items selected may vary depending on the customer’s choice.
Examples of a Package Selection Product:
-
3-course meal with entrée, main, and dessert options.
-
Full degustation menu with several options.
-
Burger deal with choice of a side and a drink.
-
Pizza deal that includes a starter, a choice of side, and a drink.
Prerequisites
Ensure:
- The Operator has the required privilege to access BackOffice.
- The Operator has the required privilege to view Products.
- The Operator has the required privilege to edit Products.
Package Selection Product
To create a Package Selection Product:
- Open/edit the Product in BackOffice.
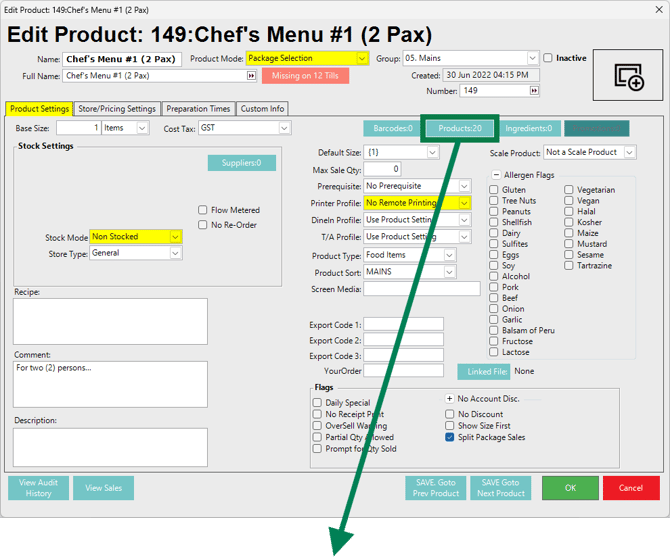
- Select Package Selection from the Product Mode drop-down in the Product header.
- Select the Product Settings tab.
- Select Non Stocked from Stock Mode in the Stock Settings area.
- Confirm the required Printer Profile is selected.
- Select Products on the Product Settings tab to add the Sub-Products.
- Add each required Sub-Product option that should be available as part of the package selection.
- Enable Zero Price for the Products added to the package where the package is sold at a fixed package price.
- Select the Store/Pricing Settings tab.
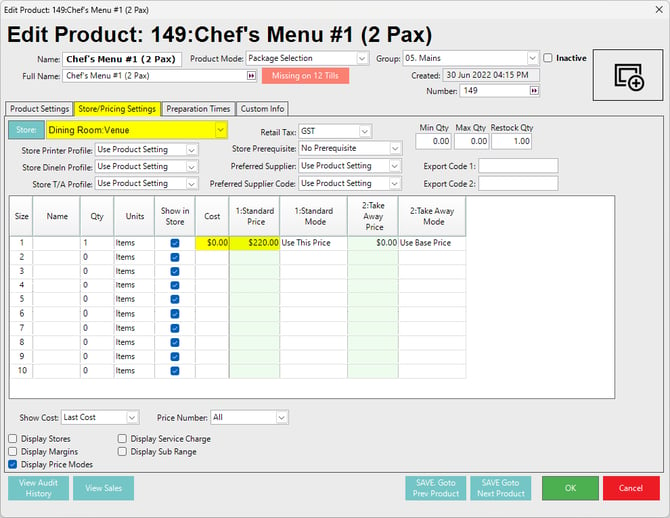
- Enter the selling price for the Package Selection Product.
- Click OK to save the Product.
Expanded details follow below.
Product Settings Tab
The Product Settings tab is used to define the core Product behaviour for the Package Selection Product.
For a Package Selection Product:
- Set Stock Mode to Non Stocked.
- Use the Products button to open the Sub-Products window.
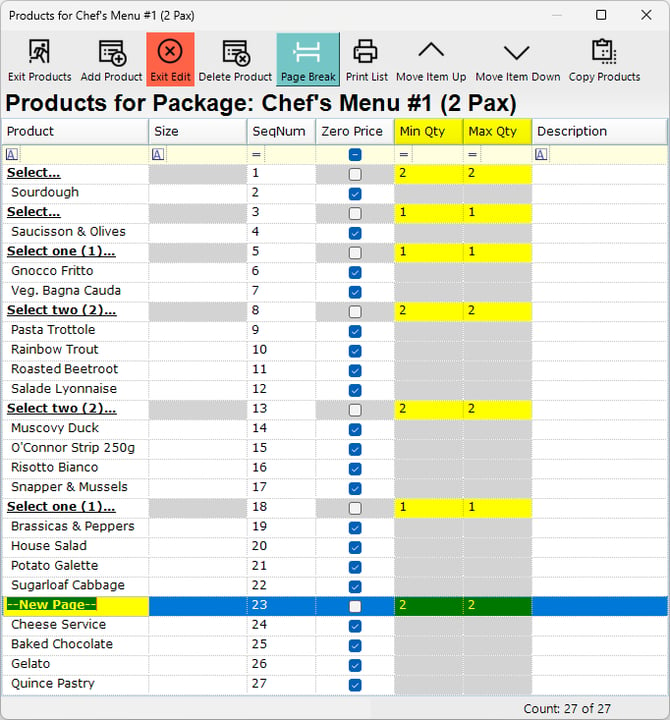
- Add each Product that should be available for selection during the sale, along with the Size if necessary.
- Ensure to set the Min Qty & Max Qty against each Sub-Product to limit the choices.
- Add Page Breaks where necessary to split up the workflow at the POS. The '--New Page--' field may be changed when you click Edit Mode.
- Enable Zero Price for included selectable Products when the package is sold at the fixed package price.
- Configure Printer Profile as required for the package. Setting the profile to No Remote Printing will default the Products to their actual respective Printer Profiles.
- Enable Split Package Sales if the total sales amount for the package should be prorated across the selected package items.
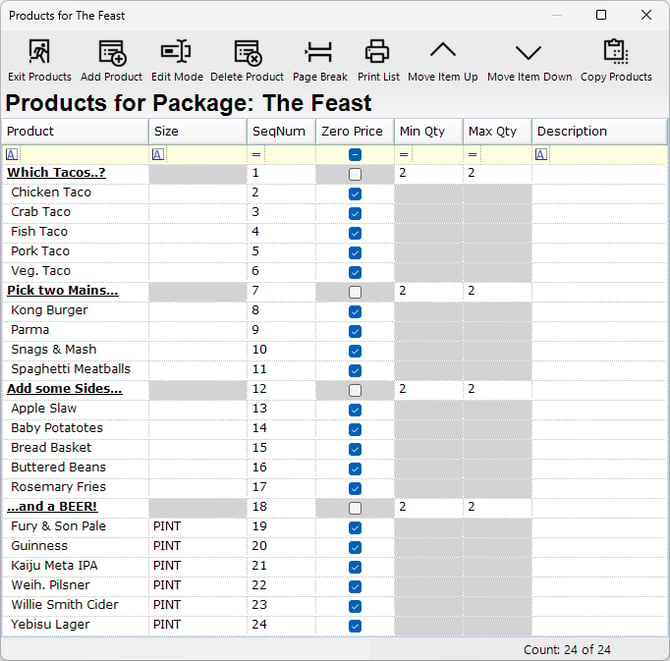
This is another example of a Package Selection Product with the choices available. In this instance, Tacos and a Main, plus some Side options and a Pint of beer/cider:
Store/Pricing Settings Tab
The Store/Pricing Settings tab is used to enter the selling price for the Package Selection Product.
For each required Store:
- Select the required Store.
- Enter the package selling price in the required price column.
- The Cost for a Package Selection Product will show as zero dollars.
- Confirm the required Price Mode behaviour.
- Confirm the package price is entered against the main Package Selection Product, not against the zero-priced selectable Products.
Confirmation
To confirm the Package Selection Product is configured correctly:
- The Product Mode is set to Package Selection.
- The Product is set to Non Stocked.
- The required selectable Products are added through the Products window.
- Zero Price is enabled for the selectable Products where required.
- The package selling price is entered on the Store/Pricing Settings tab.
- The required printing behaviour is configured for the package and its selectable Products.
updated to: bepoz v4.9.0.4