
Overview
Weekend Surcharges are increasing in popularity in the Hospitality sector. While there are a number of various ways that Weekend Surcharges can be set up in bepoz, this document outlines the recommended method.
📌 Note:
The Weekly Schedule is used over and above a Scheduled Job as the Weekly Schedule is saved in the POS Local Database and if the POS goes Offline or into Standalone Mode the Schedule will start and stop as normal.
Prerequisites & Recommendations
- Operator Privilege to Maintain Weekly Schedule.
- 'Use Price Modes' flag must be on.
- Price Names with Surcharge % and Discount Names need to be configured beforehand - please discuss with your bepoz Implementation Technician during your training, or with our Support Team should you wish to migrate to this method.
- Account/Member Pricing needs to be configured to 'Use Till PriceNumber' with a set Discount % and not as a Price Level; 'Force Account Price' flag must be on.
Process
Step 1. Set up Price Names (a.k.a. Price Levels)
- This is where we configure multiple Pricing Levels as the backbone of the Surcharging setup. Please reach out to Support if you are currently using an established method - or discuss with your Technician during training/initial set up.
- Note: For Multi-Venue systems, each Venue must have the same Price Name convention and Price Mode configuration. Do NOT change this by yourself in an established Multi-Venue deployment.
Step 2. Set up Product Pricing and Price Modes
This must be configured for all Products. It can be applied at the Product or Product Group level to support inventory-wide scaling and consistent treatment of Product types.
- Price Level 1 (the 'Standard' day-to-day Pricing) needs to be set to Price Mode: 'Use This Price' with the correct selling price set against each Product.
- Any additional Price Levels need to be set to Price Mode: 'Use Base Price' with ALL Product Prices set to $0.00.
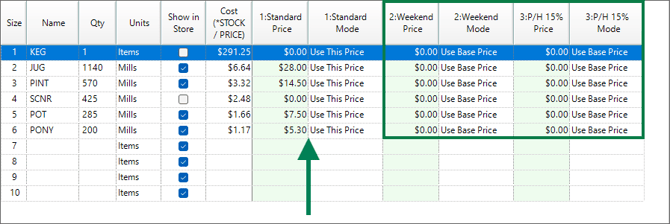
Step 3. Price Copy - to change Price Mode
Price Copy only needs to be used to set the Price Mode to 'Use Base Price' for just your extra Price Levels that are not the 'Standard' Price. Please consult your bepoz Technician during training or our Support Team for assistance.
Step 4. Set up Weekly Schedules
❗IMPORTANT:
Weekday Schedule automation does not currently support Venue Groups, Venue Sets, or Store Groups, so localised daily Surcharges/Events must be configured individually for each Venue.
Set up the Weekday Schedules (On / Off); each Daily Schedule requires two (2) schedule setups – one to switch ON, and one to switch OFF:
To setup a Weekly Price Number Schedule ON:
- Navigate to Operational Setup from the BackOffice menu.
- Open Weekly Schedule.
- Select a Venue first from the Venue drop-down menu (right-hand side), you can't edit this in the pop-up later.
- Select 'Add New Event' from header menu. A 'New WeekSchedule' dialogue box will appear.
- Set the Workstation, e.g. All Tills
- Select the Day of the Week for the schedule, e.g. Saturday
- Select the Start Time of Day to enable surcharge, e.g. 06:00 (24hr time)
- Set the Price Number, e.g. Weekend
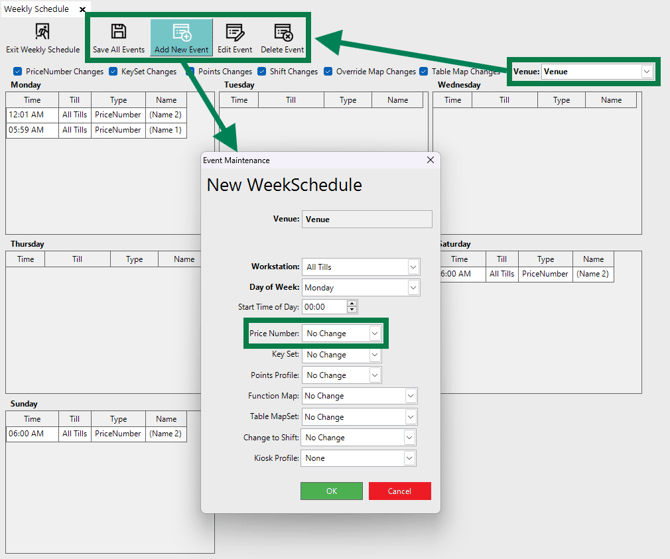
- Click "OK" to save and close the 'New WeekSchedule' dialogue box.
- It is recommended to have both a Saturday and Sunday Weekly Schedule in place if you are also using Public Holiday Surcharges - this will ensure that Weekend Pricing Schedules will continue to work if a Public Holiday falls on the Saturday. It also allows you to charge different rates, e.g. 10.0% on Saturday and 12.5% on Sunday.
❗IMPORTANT:
Schedules will continue to function until they are overridden by another change; however, ALL Weekly Schedules/Events will reset on Monday morning at 00:00.
If you require an Event to carry over into the early AM of Monday, you will need to configure additional Events to cover those few hours and then revert to the default setting:
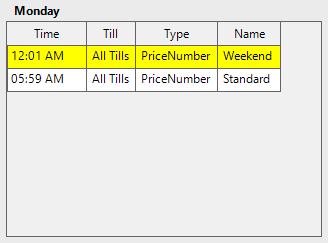
To setup a Weekly Price Number Schedule OFF:
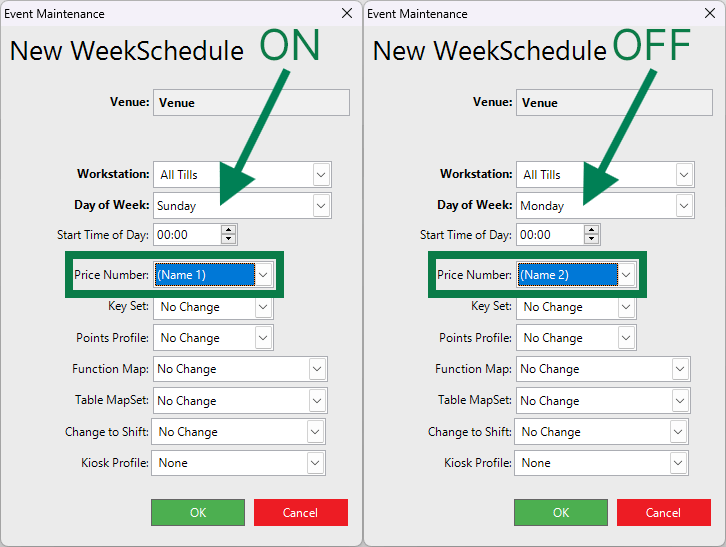
- Create a new Schedule/Event with the exact same settings as 'To setup a Weekly Price Number Schedule ON', but on the day the Schedule should be turned Off, e.g. Monday. Even though Weekday Schedules reset on a Monday, do this as a failsafe - especially after Weekend Pricing.
- Set the Price Number back to your 'Standard' Price Level; this will stop the Surcharge from being applied and return to normal weekday Pricing.
- Repeat the procedure for each Venue Event within a Multi-Venue.
- Click OK and Save All Events in the header menu.
| Flags/Field | Description |
|---|---|
| Venue | Displays the Venue set where the Schedule will be enabled |
| Workstation | Sets the POS Till(s) where the Schedule will be enabled |
| Day of Week | Sets the Day to apply the Schedule |
| Start Time of Day | Sets the Time to apply Schedule |
| Price Number | Choose which Price Number to apply for the Schedule |
| Key Set | Choose which Key Set to apply, e.g. Breakfast Menu in the mornings only |
| Points Profile | Sets which Points Profile to use for the Schedule, this can be used to promote bonus points earning at certain times |
| Function Map | Please contact our Support Team before using this feature |
| Table MapSet | Changes which Floor Plan appears at the POS, this can be useful for functions when your table arrangement can differ |
| Change to Shift | Sets the current shift/service, e.g. lunch, dinner, etc. |
| Kiosk Profile | Sets the kiosk properties based on the selected profile. |
Step 5. Update POS Tills/Tablets
❗IMPORTANT:
ALL Tills/Tablets/etc. must be turned on and connected to the SmartController to receive the Schedules.
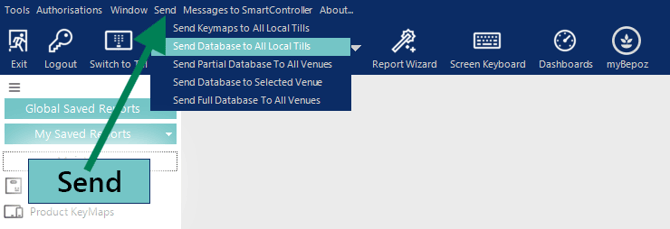
For a single Venue:
- From the BackOffice Header menu, click 'Send' then select Send Database to All Local Tills
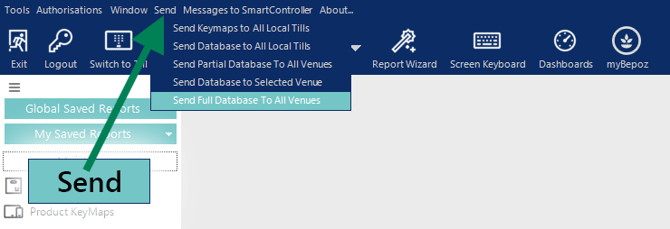
For a Multi-Venue:
- From the 'Head Office' (HO) BackOffice Header menu, click 'Send' then select Send Full Database to All Venues
updated to: bepoz v4.9.0.1