Overview
The Weekly Schedule in BackOffice allows you to automate Events based on your organisation’s operational requirements.
Unlike Scheduled Jobs, Weekly Schedule Events do not rely on SmartController. They run directly on SmartPOS workstations, ensuring Events still occur even if SmartController is offline, or the network is temporarily down.
Events can automatically update the following at the specified times: Price Numbers, Keysets, Points Profiles, Till Function Override Maps, Table MapSets, and Shifts.
When creating a Schedule, remember that you may also need to create additional Events to return settings to their original state when required.
Prerequisites
- Operator Privilege flag to Maintain Weekly Schedule
Accessing the Weekly Schedule
Once permissions are in place, Operators can create and manage Weekly Schedules in BackOffice.
-
Navigate to Operational Setup in the BackOffice side menu.
-
Select Weekly Schedule.
-
The Weekly Schedule will open in a new tab, displaying tools for adding, editing, and deleting Events, with optional Flags to show/hide the various types of Events.
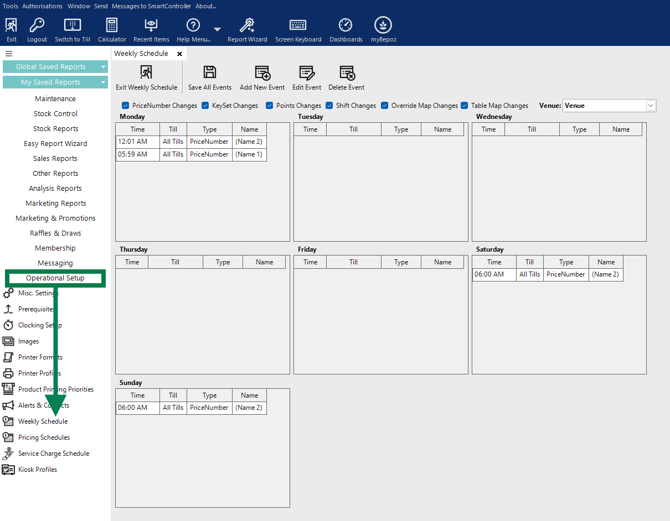
Event/Scheduling Options
| Flags/Field | Description |
|---|---|
| Venue | Displays the Venue set where the Schedule will be enabled |
| Workstation | Sets the POS Till(s) where the Schedule will be enabled |
| Day of Week | Sets the Day to apply the Schedule |
| Start Time of Day | Sets the Time to apply Schedule |
| Price Number | Choose which Price Number to apply for the Schedule |
| Key Set | Choose which Key Set to apply, e.g. Breakfast Menu in the mornings only |
| Points Profile | Sets which Points Profile to use for the Schedule, this can be used to promote bonus points earning at certain times |
| Function Map | Please contact our Support Team before using this feature |
| Table MapSet | Changes which Floor Plan appears at the POS, this can be useful for functions when your table arrangement can differ |
| Change to Shift | Sets the current shift/service, e.g. lunch, dinner, etc. |
| Kiosk Profile | Sets the kiosk properties based on the selected profile. |
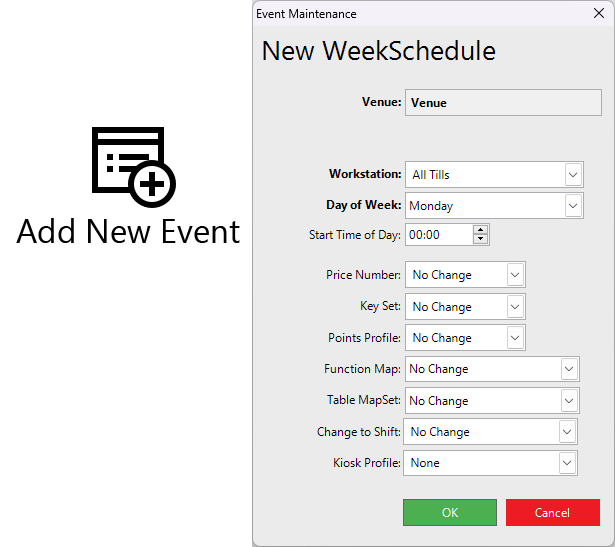
Adding a New Event
- Select a Venue first from the Venue drop-down menu (right-hand side), you can't edit this in the pop-up later.

- Select 'Add New Event' from header menu. A 'New WeekSchedule' dialogue box will appear.
🔗 Further Reading: Weekly Surcharge Setup
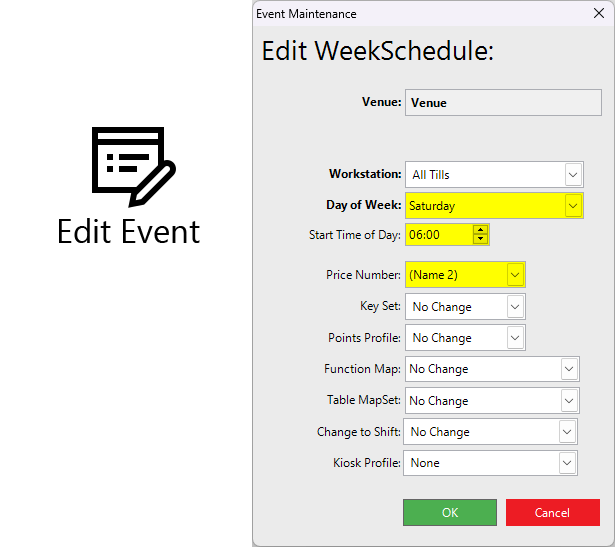
Editing an Event
- To edit an existing Event, highlight the desired Event and click on the 'Edit Event' button in the header - double-clicking an Event will perform the same.
Deleting an Event
- To Delete Event/s from the Schedule, highlight the desired Event and click the 'Delete Event' button.
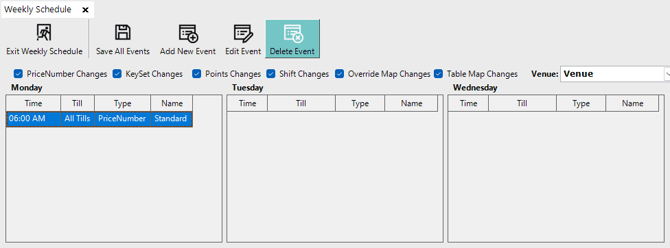
❗Important: Deleting an Event is instant if you ONLY have one Event Scheduled for that day. Having multiple Events scheduled in one day will present you with a warning prompt and options (outlined below).
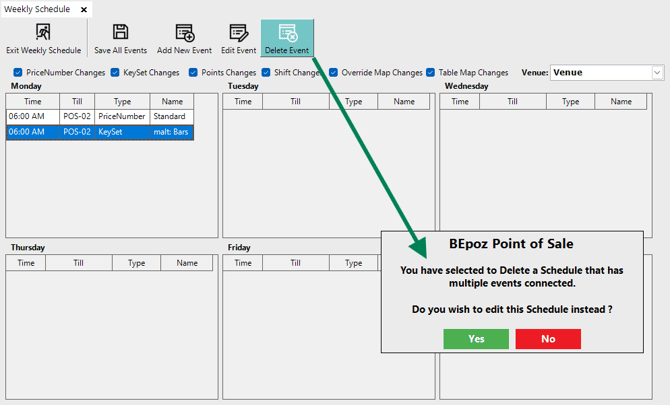
- Deleting an Event where multiple Events are Scheduled on the same day will display a prompt asking if the Operator would like to "edit the Schedule instead?"
💡Tip: Selecting 'Yes' will allow you Edit the selected Event.
⚠️ WARNING ⚠️
Selecting 'No' will delete ALL Events listed on that day and you will need to re-add the ones you still require.
Important Notes:
- Weekly Schedule Events are stored locally in the POS Tills, they continue unchanged until another Event overrides them, or are reset on Monday, or manually changed from the POS Till(s). This is especially important to remember for Price Level changes.
- All Scheduled Events will automatically revert back to their default settings on Monday morning at 00:00.
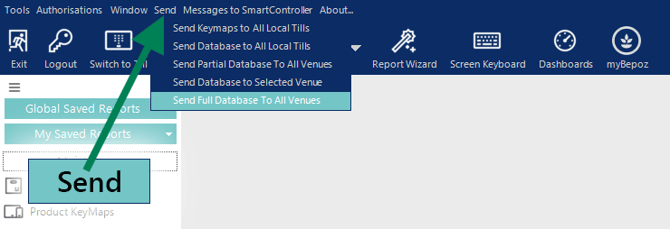
- For Multi-Venue systems, always 'Send Full Database To All Venues', especially for promotional/temporary Events.
updated to: bepoz v4.9.0.1