
Overview
This guide explains how to create or edit receipt Header and Footer lines in bepoz BackOffice using Operational Setup > Printer Formats.
Each Header and Footer can contain multiple lines of custom text, with individual formatting options applied to each active line.
Prerequisites
- Confirm the Operator has the correct privileges to maintain Printer Formats.
- Before editing an existing Printer Format, check the Used By column to confirm which Tills or Workstations use the format and will be affected by the change.
Configuration Steps
- Navigate to BackOffice > Operational Setup > Printer Formats.
- Select the required Venue at the top of the Printer Formats list if filtering is required.
- Create or edit the required Printer Format:
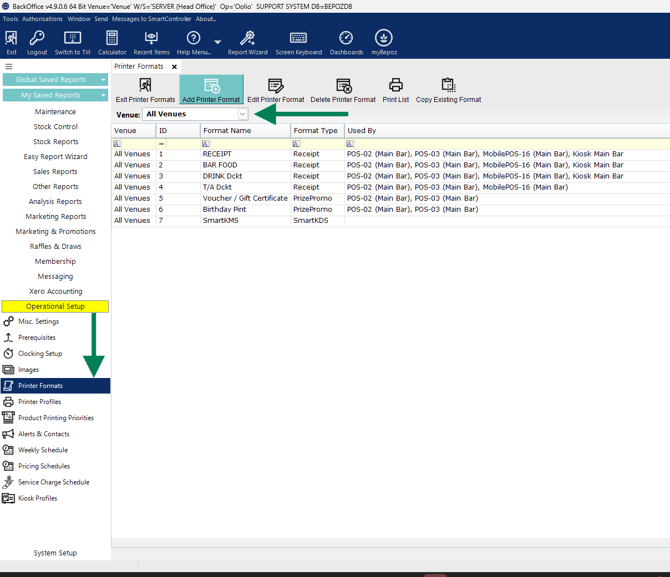
- Click Add Printer Format to create a new Printer Format.
- Highlight an existing Printer Format and click Edit Printer Format to modify it.
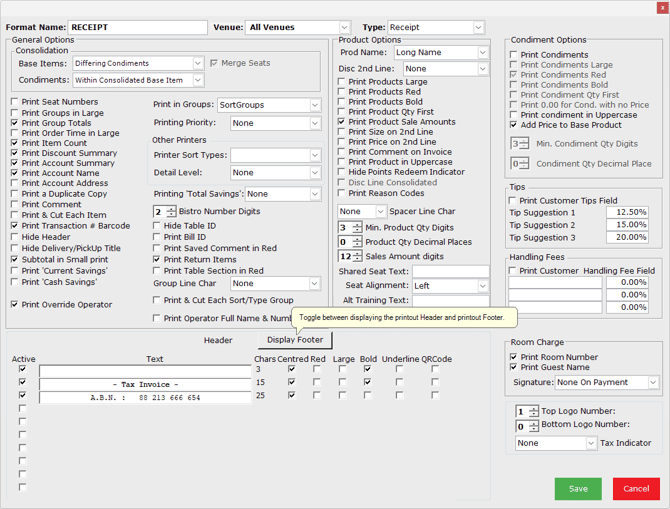
- Locate the Header and Footer line grid at the bottom of the Printer Format Setup window.
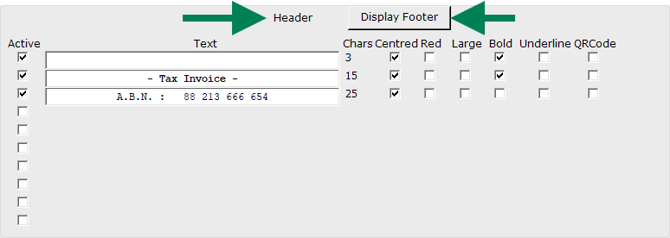
- Header lines are displayed by default.
- Click Display Footer to switch the grid from the Header lines to the Footer lines. The display will swap titles when you toggle between Header and Footer settings.
- When the Footer lines are displayed, use the same Header/Footer display button to switch back to the Header lines.
- The button controls which set of lines is currently displayed for editing; it does not display both Header and Footer lines at the same time.
- Tick Active for each line that should print.
- Untick Active to disable a line without removing its text.
- Up to ten lines are available for the Header and ten lines for the Footer.
- Enter or edit the required content in Text.
- Inserting only spaces in a Text line allows you to create line spacing on the Header or Footer.
- Chars displays the chatacter count of each Text line.
- Select any required formatting options:
- Centred — centres the content on the line.
- Red — prints the content in red on printers that support two-colour printing.
- Large — prints the content using a larger font.
- Bold — prints the content in bold.
- Underline — underlines the content.
- QRCode — renders the line content as a QR code instead of plain text.
- Repeat the process for any additional Header or Footer lines.
- Confirm Hide Header under General Options is not selected if the configured Header should print.
- Click Save to apply the Printer Format changes.
Confirmation
- Print a test receipt from a Till or Workstation that uses the updated Printer Format.
- Confirm each active Header and Footer line appears with the expected text and formatting.
- Confirm inactive lines do not print.
- If the Header does not appear, recheck the Hide Header option under General Options.
- Changes apply only to Tills or Workstations that use the selected Printer Format.
Further Reading
For further information about Printer Formats, see:
updated to: bepoz v4.9.0.6