
Overview
For venue managers and authorised staff with Backpanel access.
Purpose
Set up and manage multi-tier membership, wallet designs and registration QR codes.
Audience
Venue managers and staff, based on assigned permissions.
System
MyPlace Lite (Easy Card) v1.2.
‼️ Important: The Template Account Number must be set up by the bepoz onboarding or support team. Venue staff must not edit it in Backpanel, or deactivate or move the related template account number in the bepoz POS system.
Contact bepoz Support before requesting any change.
1. About This Guide
This guide explains how authorised venue users configure the new MyPlace Lite multi-tier functions in Backpanel. It covers tier creation, tier-specific mobile wallet designs, and registration QR codes.
2. What Changed
- The previous limit of three tier groups has been removed; venues can now create multiple tier groups as required.
- Each tier includes a Template Account Number supplied from the bepoz POS system.
- Tier groups can be activated or deactivated. The first tier is the default tier and cannot be made inactive.
- Mobile Wallet settings can be customised separately for each tier group on iOS and Android.
- A separate registration QR code is available for each active tier group.
3. Before You Begin
- Confirm that your user account has permission to access the relevant Backpanel pages.
- The Template Account Number must be set up by the bepoz onboarding or support team before the tier is used.
- Prepare final wallet branding assets and wording.
Backpanel Navigation
| Function | Menu path |
|---|---|
| Tier setup | Features > People > Tiers & Membership > Tiers |
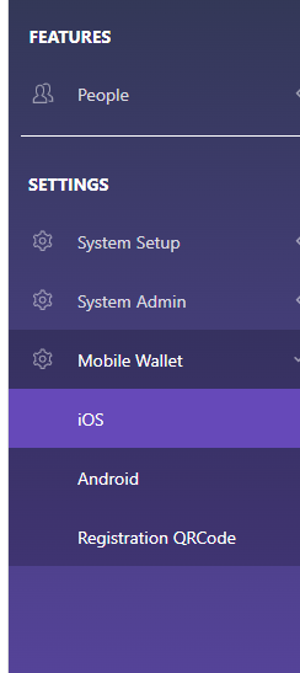
| iOS Wallet | Settings > Mobile Wallet > iOS |
| Android Wallet | Settings > Mobile Wallet > Android |
| Registration QR Code | Settings > Mobile Wallet > Registration QRCode |
Figure 1. Tier setup navigation in Backpanel.
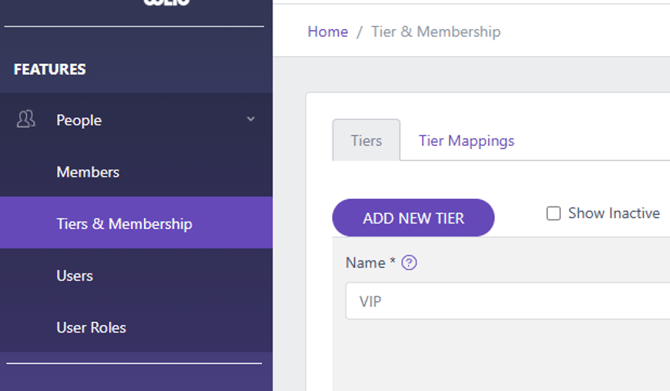
Figure 2. Mobile Wallet and Registration QRCode navigation.
Set Up Tier Groups
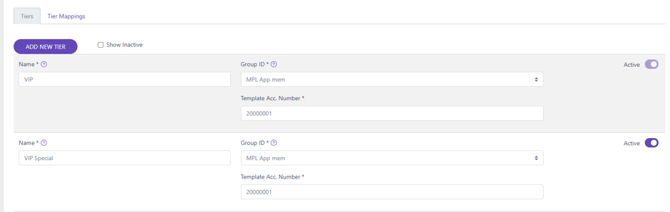
Use the Tiers page to create and manage membership tiers. Tier groups cannot be deleted; they can only be active or inactive.
| Field | Required | How to set up | Important notes |
|---|---|---|---|
| Name | Yes | Enter the customer-facing tier name, for example VIP or VIP Special. | Use a clear and unique name so staff can identify the tier. |
| Group ID | Yes | Select the matching bepoz group from the available list. | Confirm the correct group with the bepoz implementation or support team. |
| Template Account Number | Yes | Use the value set up by the bepoz onboarding or support team. | Do not edit this value in Backpanel, or deactivate or move the related template account number in the bepoz POS system. Consult bepoz Support first. |
| Active | Yes | Turn on to make the tier available for wallet and QR code setup. Turn off to hide it from active tier lists. | The first tier is the default tier and cannot be made inactive. |
Create a New Tier
- Open the Tiers page
Go to Features > People > Tiers & Membership > Tiers. - Select Add New Tier
A new tier setup area appears below the existing tiers. - Enter tier details
Complete Name and Group ID. Confirm that the Template Account Number is the value supplied by the bepoz implementation team. - Set the status
Leave Active switched on when the tier is ready to use. Make it inactive when it should not be available. - Review before continuing
Confirm the tier name, bepoz group and template account configuration before setting up wallet designs or publishing a QR code.
⚠️ Warning: Do not edit the Template Account Number in Backpanel. Do not deactivate or move the related template account number in the bepoz POS system.
Contact bepoz Support before making any change.
Figure 3. Tier list and setup fields.
Configure Mobile Wallet by Tier
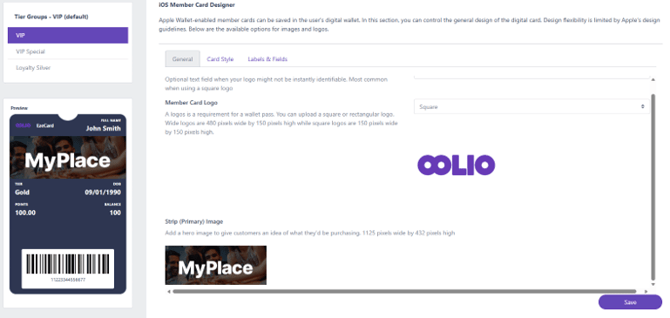
Mobile Wallet settings can be configured separately for iOS and Android. All fields for a new tier inherit the values from Tier Group 1 by default.
| Field | Required | How to set up | Important notes |
|---|---|---|---|
| Tier group | Yes | Select the tier you want to review or customise. | Tier Group 1 is the default. Other tiers begin with inherited settings. |
| Status label | System | Default means the tier follows Tier Group 1. Custom appears next to the tier group name when any wallet field, setup option or colour has been changed for that tier. | The label is assigned automatically. |
| General fields | As needed | Configure Logo Text, Member Card Logo and Strip (Primary Image). | Use approved venue branding assets. |
| Card Style / Labels & Fields | As needed | Update colours, labels and displayed wallet content for the selected tier. | All fields may be customised by tier. |
| Save | Yes | Save after completing changes for the selected tier and platform. | Changes appear after midnight based on the configured timezone of the venue. |
Configure a Tier-Specific Wallet
- Choose the platform
Open Settings > Mobile Wallet > iOS or Settings > Mobile Wallet > Android. - Select the tier group
Choose the tier from the tier list. Review the preview before editing. - Review inherited settings
New tiers initially use all fields from Tier Group 1 and are shown as Default. - Customise the selected tier
Change any required fields, colours, labels, logos, images or wallet content. - Save the design
Select Save and repeat the process on the other platform when needed.
‼️ Important: There is no automatic reset for a customised tier. To return it to the default design, manually change all fields so they match Tier Group 1.
🕛 Note on Timing: Saved wallet fields, colours, points and balance details update after midnight according to the configured timezone of each venue. Manual page refresh is not supported as an update method.
Figure 4. iOS Member Card Designer with tier selection and preview.
Configure and Download a Registration QR Code
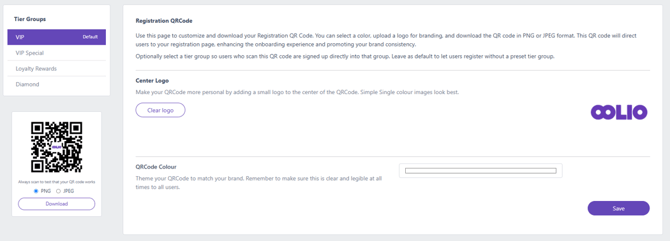
Only active tier groups appear in the Tier Groups list. Select a tier group to manage its own registration QR code settings. Each selected tier can have its own centre logo and QR code colour, and customers who scan the code are directed to registration for that tier.
| Field | Required | How to set up | Important notes |
|---|---|---|---|
| Tier Groups | Yes | Select the required tier from the active tier list. | Only active tier groups are shown. Selecting a tier loads that tier’s own QR code settings and preview. |
| Status label | System | Default identifies the first/default configuration. Custom appears next to a tier group name when that tier has its own saved QR code setup or colour. | The status is assigned automatically based on the selected tier’s configuration. |
| Centre Logo | Optional | Upload a suitable logo for the centre of the selected tier’s QR code, or use Clear logo to remove it. | Simple, single-colour artwork is recommended. The displayed guidance specifies a 150 x 150 image area. |
| QRCode Colour | Optional | Choose a clear, high-contrast QR code colour for the selected tier. | Use a colour that remains easy to scan against the background. |
| Save | Yes, after changes | Select Save to store the centre logo and colour for the selected tier. | Confirm the correct tier is selected before saving. |
| QR code preview | System | Review the QR code generated for the selected tier. | Always scan-test the code before publishing. |
| File format | Yes | Choose PNG or JPEG. | Use the format that best suits the venue’s digital or print material. |
| Download | Yes | Select Download to save the selected tier’s QR code. | Use clear tier names in saved files to avoid publishing the wrong code. |
Configure, Download and Test the QR Code
- Open Registration QRCode
Go to Settings > Mobile Wallet > Registration QRCode. - Select the tier
Choose the required tier from the active Tier Groups list. The page loads the QR code fields and saved settings belonging to that tier. - Customise the selected tier
Upload or clear the centre logo as required, choose the QR code colour, and select Save. These settings apply only to the selected tier group. - Select a file format and download
Choose PNG or JPEG, then select Download. Save the file using a clear tier name, for example VIP_Registration_QR.png. - Test before publishing
Scan the downloaded QR code on a mobile device and confirm that the correct tier registration page loads.
Figure 5. Registration QRCode page showing the active tier list and tier-specific QR code fields.
Inactive Tier Behaviour
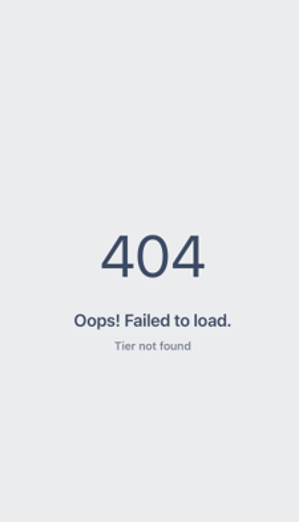
If a customer scans a QR code for an inactive tier, the browser displays a 404 error with the message “Tier not found.”
Figure 6. Error shown when an inactive tier QR code is scanned.
Pre-Launch Checklist
| Area | Check | Complete |
|---|---|---|
| Tier setup | Tier name, template number and Group ID are correct. | ☐ |
| bepoz configuration | Template Account Number has been set up by the bepoz onboarding or support team. Venue staff have not edited it, deactivated it, or moved it in the bepoz POS system. | ☐ |
| Tier status | Only tiers ready for customer use are active. | ☐ |
| iOS wallet | The selected tier shows the intended branding, fields and colours. | ☐ |
| Android wallet | The selected tier shows the intended branding, fields and colours. | ☐ |
| Overnight timing | Stakeholders understand that wallet changes appear after midnight in the venue’s configured timezone. | ☐ |
| QR code | For each active tier, the intended centre logo and QR code colour are saved, and the downloaded code opens the correct tier registration page. | ☐ |
| Test each active registration QR code before publishing it to customers. | ☐ | |
| Publishing | The correct QR file is used in venue signage, email or digital channels. | ☐ |
Troubleshooting
| Issue | Action |
|---|---|
| Template Account Number needs to modify | Do not edit it in Backpanel, and do not deactivate or move the related template account number in the bepoz POS system. Contact bepoz Support and confirm the required change. |
| Tier does not appear in wallet or QR code list | Check whether the tier is active and whether your account has the required permission. Only active tiers appear in the Registration QRCode tier list. |
| Wallet changes are not visible immediately | Wait until after midnight in the venue’s configured timezone. Manual refresh is not supported as an update method. |
| Custom tier needs to reset back to default tier | Manually update all fields to match Tier Group 1. There is no automatic reset. |
| QR code opens a 404 Tier not found page | The selected tier is inactive. Use an active tier QR code for customer registration. |
Current Limitations
- Wallet content and colour updates are not triggered by manually refreshing the page, only for daily automatically.
- The “M” prefix used for account and card numbers remains unchanged in this version.
- Registered accounts cannot be moved from one tier group to another.
- When the same mobile number and/or email address is already associated with an existing bepoz account, system creates a new account in bepoz.
‼️ Reminder: For Template Account Number, bepoz group mapping or account-number setup questions, consult the bepoz onboarding or support team.
Do not edit, deactivate or move the template account number in the bepoz POS system without their guidance.
updated to: bepoz v4.9.0.4