
Overview
The Simplified Split Bill function allows you to separate selected products from an open table and process payment for one customer at a time.
SmartPOS displays the original table bill and the current split bill side by side. You can move products between them, apply eligible discounts or vouchers, and repeat the process until the table is fully paid.
‼️ Important: This function and example workflow are applicable for SmartPOS Till Workstations only, the feature is not yet available for mPOS.
Prerequisites
The Simplified Split Bill function was introduced in bepoz version 4.8.2.0.
Your venue must be running version 4.8.2.0 or later, and the required Function Keys must already be available on the SmartPOS till.
Functionality and Benefits
Simplified Split Bill provides a faster way to manage separate payments for customers sharing a table.
Key benefits include:
- Select individual products for each customer without manually creating separate tables.
- Move products between the main bill and split bill before taking payment.
- Transfer all products assigned to a seat number in one action.
- Apply eligible discounts, vouchers, or customer accounts to the current split.
- Process multiple payments while keeping the remaining products on the original table.
- Save a partially paid table when some customers are not ready to pay.
- Automatically close the table after all products have been paid.
💡 Tip: This function is best used once the table has finished ordering and separate payments will be processed one after another. Additional products can still be added if the remaining customers decide to stay, but extra steps are required before any new products can be included.
Processing a Simplified Split Bill
1. Open the Table
Select Table/Open Table from the SmartPOS screen.
Select the table containing the bill you want to split.
Confirm that the correct table and ordered products are displayed.
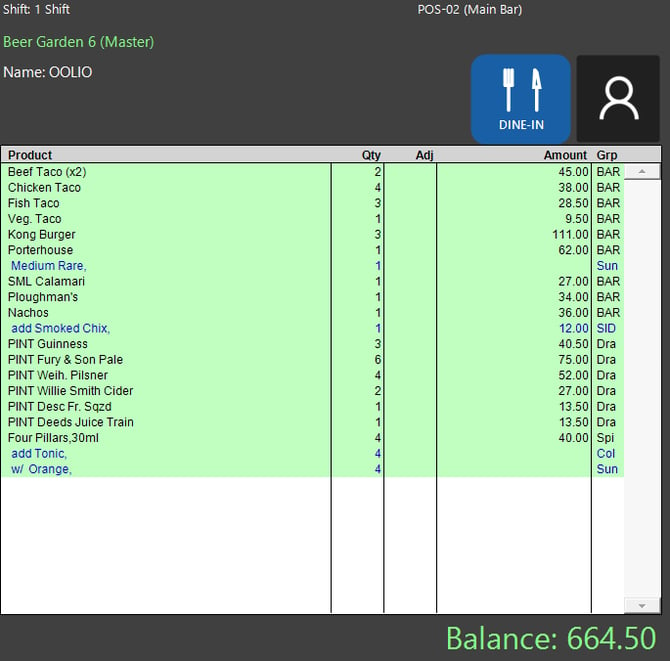
📌 Note: The technical function name is Tables & Accounts, with the Sub-Function name Simplified Split Bill. The Table/Table Open Function Key may have a different name on your venue’s Function Map, such as Table, Table #, Open Table, or another venue-specific label.
2. Start Bill Split Mode
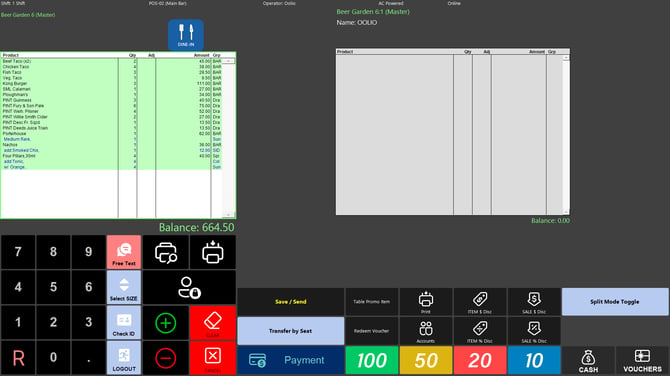
Select Split Bill from the Open Table Function Map. The name of the Split Bill button may differ depending on the till layout used at your venue.
Confirm that SmartPOS displays:
Main Bill on the left, containing the table’s unpaid products.
Split Bill on the right, which will be blank, ready for new products.
Example belows shows a starting table balance of $664.50
3. Move Products to the Split Bill
- Select each product the customer wants to pay for from the Main Bill.
- Tap the Split Bill window to move the products across.
- Multiples of a product will allow you select the quantity or all, these should be moved to the Split Bill window individually. This will show as a negative in the adjustment (Adj) column on both sides, with the remainder in the Main Bill and the moved quantity (Qty) in the Split Bill.
Example below shows a multiple of a single product added to the Split Bill
window with additional products ready to be moved across.
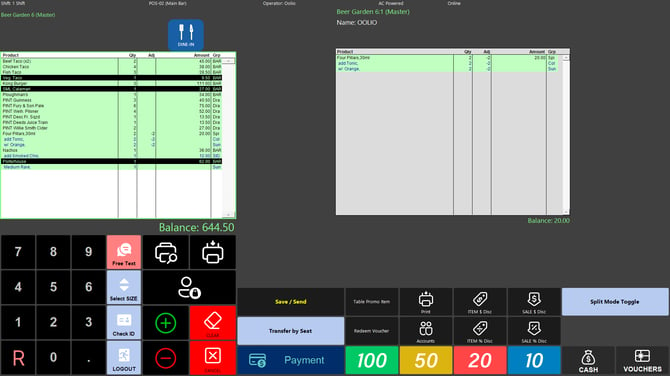
- Confirm that the selected products appear in the Split Bill.
- Continue adding products as required and review the total before payment.
To correct a selection:
- Select the product(s) in the Split Bill.
- Tap the Main Bill window.
- Confirm that the product(s) returns to the Main Bill.
Transfer Products by Seat Number (alternate method)
Use this option when ordered products have been assigned to seat numbers.
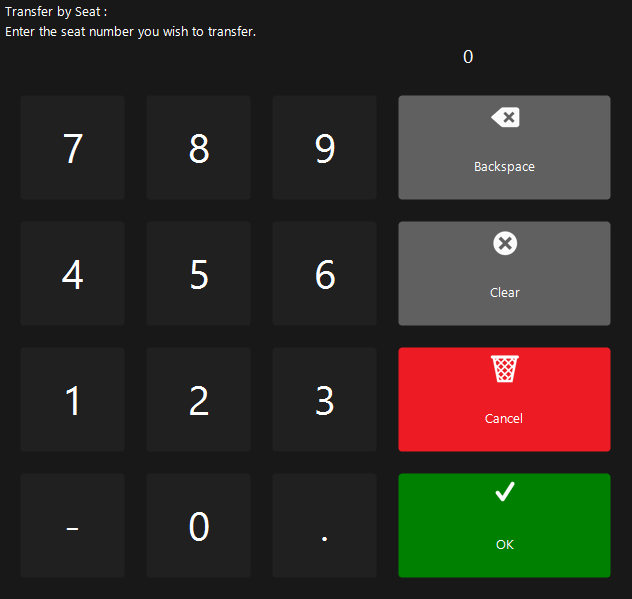
Select Transfer by Seat.
Enter the required seat number using the numeric keypad.
Confirm the seat number and tap OK.
Review the Split Bill to ensure all products assigned to that seat were transferred.
Apply Discounts, Vouchers, or Accounts (if applicable)
Where permitted by your venue’s procedures:
- Confirm that the correct products are displayed in the Split Bill.
- Apply the required order discount or voucher.
- Attach or detach the appropriate customer account when required.
- Review the updated split total before taking payment.
Discounts, vouchers, and account changes apply to the current split bill being processed.
4. Process the Split Payment
- Confirm the products and amount displayed in the Split Bill.
- Select Payment from the Split Bill function panel (or the relevant cash option).
- Select the required payment method.
- Complete the payment as prompted.
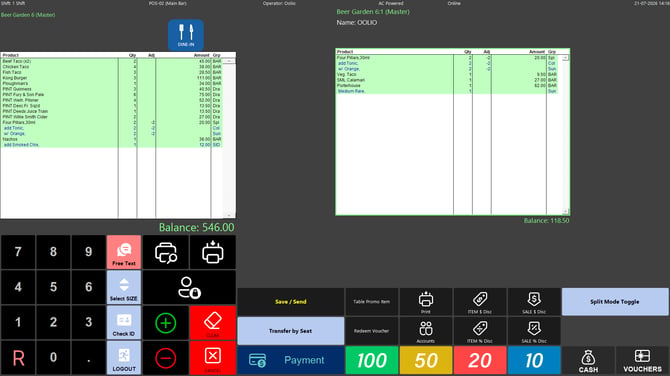
- Confirm that the payment is approved and the Split Bill clears.
After payment, the split area is ready for the next customer, and the Main Bill updates to show only the remaining unpaid products.
Example below shows a remaining table balance of $546.00
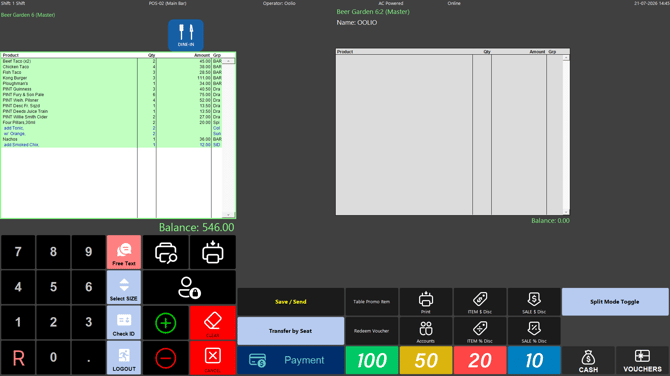
5.a. Process Additional Payments
- Select the next customer’s products from the remaining Main Bill.
- Move the products to the Split Bill window.
- Review the selected products and total.
- Apply any eligible discount, voucher, or account.
- Select Payment and complete the payment.
- Repeat these steps until all required payments have been processed.
-- OR --
5.b. Save a Partially Paid Table
When some customers are not ready to pay:
- Confirm that completed split payments have been processed successfully.
- Save the table with the remaining unpaid products with the Save / Send function.
- Reopen the table when the remaining customers are ready.
- Continue moving products to the Split Bill and processing payments until nothing remains.
-- OR --
5.c. Continue Adding Products to the Table
Once the Split Table function has been initialised, this is a permanent effect to that table and will always open displaying the split view. To continue adding products to the table:
- Select Table/Open Table from the SmartPOS screen.
- Tap the Split Mode Toggle function key, this will change the screen view to the standard Split Bill mode.
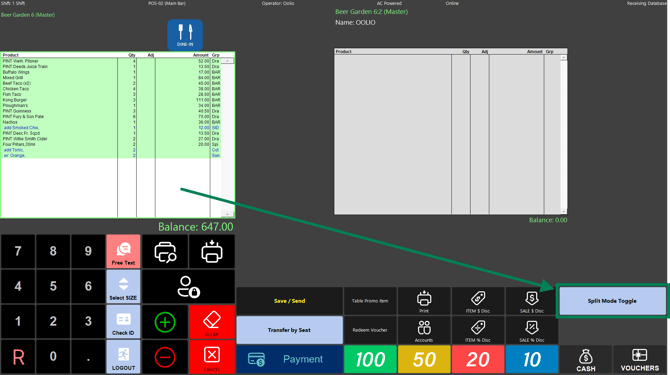
📌 Note: At this point, you cannot open the Base Split to add new products, the remaining products must all be moved into a new split first.
- Tap the screen next to the name Base Split, all of the products in this window will be selected, then tap into the empty split on the right of the screen.
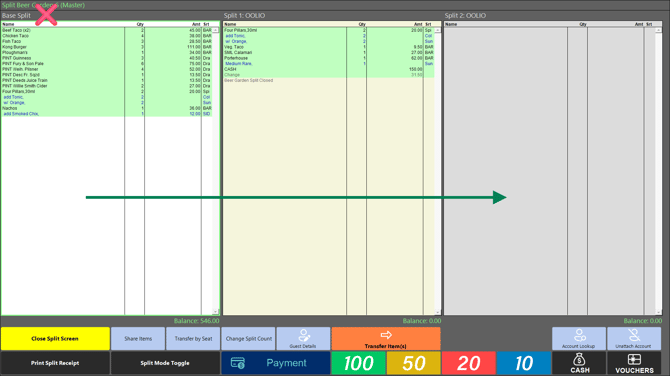
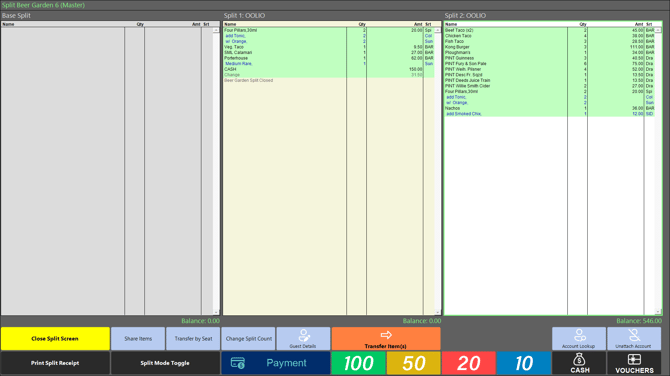
- Once moved to the new split, double-tap the white area to open the table ready for adding new products, and continue normal POS operation. The POS screen will revert back to the Menu Tabs view.
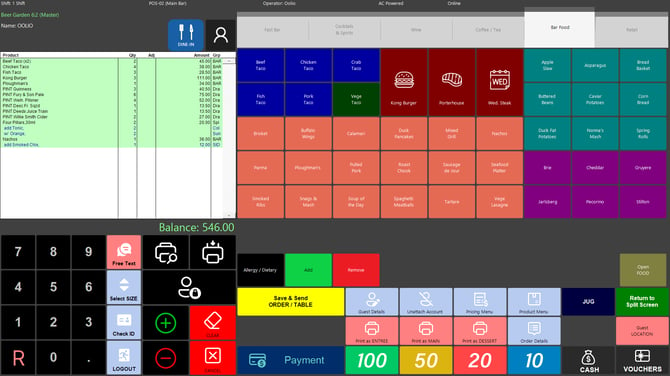
6. Taking Split Payments (again)
Once the remaining customers have finished ordering and are ready to split the updated bill, process each subsequent payment as follows:
- Select Table/Open Table from the SmartPOS screen, this will open the table into the standard Split Bill mode, however, the Base Split should now be hidden from view.
Example below shows an updated remaining table balance of $647.00
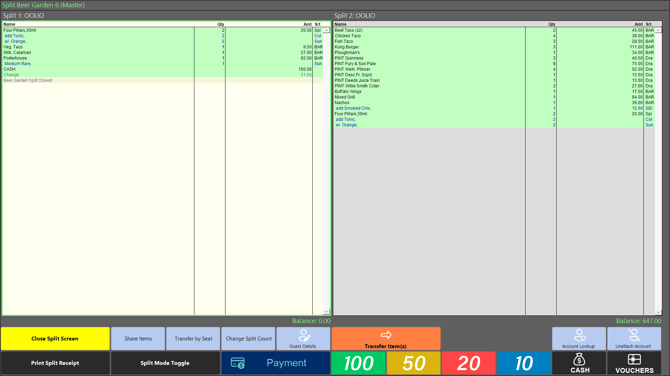
There are now two options available to process split payments and close the table.
Option 1 - Stay in this Screen
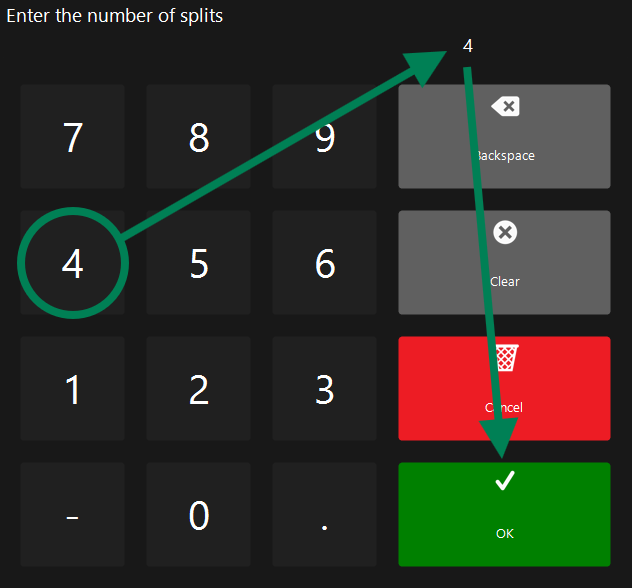
Add more splits to this screen with the Change Split Count function, move products into splits and process payments as required.
Any paid off splits need to be counted in to the new split total when adding more.
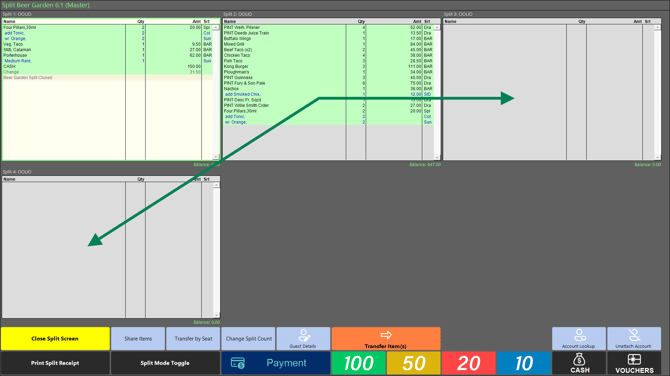
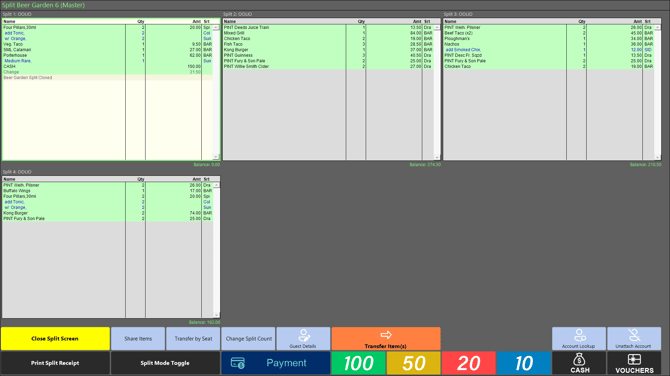
Option 2 - Toggle the Split Bill Mode
Tap the grey area of the unpaid split (which will then display white), and select the Split Mode Toggle function.
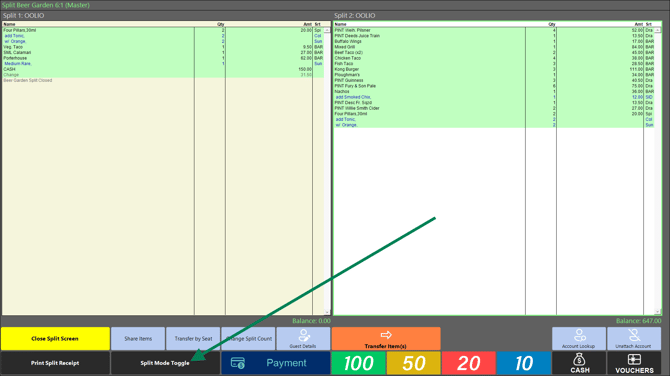
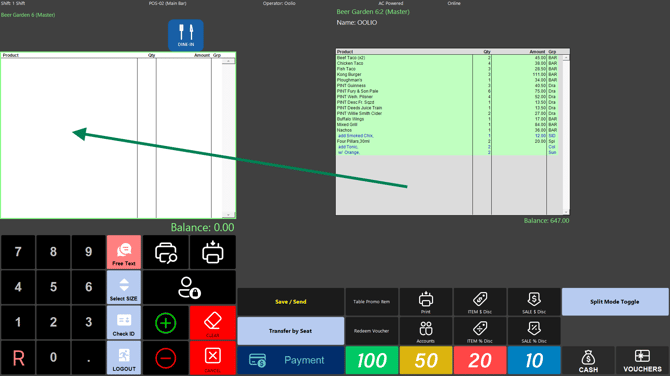
- The SmartPOS screen will revert back to the Simplified Split Bill mode.
- HOWEVER, all of the remaining products will already be set in the Split Bill window.
- Unneeded products will need to be moved back to the Main BIll window to process the first split payment.
Expected Result
Each customer can pay for selected products without staff manually creating separate split tables.
When all products have been paid, SmartPOS closes the table and exits Bill Split mode automatically. If unpaid products remain, the table can be saved and completed later.
updated to: bepoz v4.9.0.4